OAuth Walkthrough
OAuth allows you to perform actions on behalf of other users after they grant you the authorization to do so. For example, you could send signature requests on behalf of your users. This page lays out the basic steps to build your own OAuth flow and send calls on behalf of your users using an access token.
App Setup
Create an app
Before you can do anything with OAuth, you’ll need to create an app and configure it to use OAuth.
App Settings
When creating an app, you’ll need to provide the following information:
Choosing Scopes
Scopes control the level of access granted to an access token. On your app settings page, choose the scopes that fit your particular use case for OAuth. Scopes are split up by billing model and organized around specific groups of actions (like signature requests). You can read more about them in the Access Scopes section of the OAuth Overview page.
App Approval
Dropbox Sign requires production approval for apps using OAuth. That means your app can’t be authorized or added by other users until it is approved for production. When you feel your app is ready to go live, please follow the app approval process to request approval for your app.
Testing OAuth
You can authorize your app from your own account while building with OAuth. This is the approach we recommend for testing and building your OAuth flow before submitting the app for production approval.
Checking for a Dropbox Sign account
A user needs to authorize your app before an access token can be issued and used on their behalf. Dropbox Sign has an OAuth flow for two scenarios:
- Authorization code flow — user has an existing Dropbox Sign account.
- Account creation flow — user is new to Dropbox Sign.
We recommend checking whether a user has a Dropbox Sign account (/account/verify) before selecting the corresponding flow:
Payload
Code
Response if the user has an account:
Response if the user does not have an account:
Authorization Code Flow
Dropbox Sign recommends the authorization code flow for generate access tokens for users that already have a Dropbox Sign account. Sometimes called the “3 legged OAuth flow”, this approach consists of three distinct steps:
- Obtaining consent from the user generates an authorization code.
- The authorization code is exchanged for an access token using a token endpoint.
- The access token is used to send API calls on behalf of the user according to the authorization they granted.
Obtaining user authorization
Existing Dropbox Sign users can authorize your app by navigating to your app’s authorization url. This url can be constructed manually in your code or you can copy it from the app details modal of your API settings page:
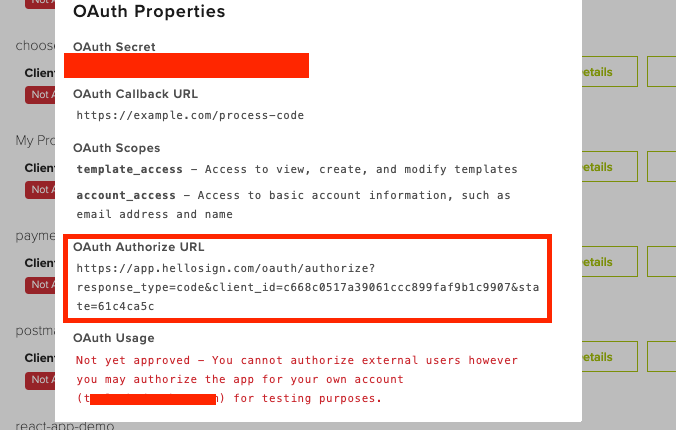
For example (line breaks for readability only):
- The
stateparameter is used for security and must match throughout the flow for a given user. It can be set to the value of your choice (preferably something random). You should verify it matches the expected value before processing parameters on an OAuth callback. - If
redirect_uriis provided provided in the Authorization URL, the value must match the OAuth Callback URL specified in the API app settings. Ifredirect_uriis not provided, users will be redirected to the Default OAuth Callback URL.
Users grant their authorization on an OAuth consent page that shows them the name of your app and the level of access (scopes) being requested. They can choose to Accept or Deny the authorization request.
Both actions will redirect the user back to your OAuth callback URL. If the user clicked Accept and authorized your app then the URL will contain a code and state parameter. However, if they clicked Deny, then only the state parameter will be present and the OAuth flow cannot be completed.
OAuth
Users must be logged into Dropbox Sign to authorize your app. They’ll be prompted for login or sign up if they’re not already signed in.
Generating an Access Token
Once the user has given their consent and you’ve retrieved the authorization code from the url, you’ll need to exchange it for an access token by calling the token endpoint. Make a POST request to /oauth/token with the following parameters:
Example
Payload
Code
Show Response
At the end of a successful Authorization Code flow, you’ll receive a payload that contains an access_token, which can be used to send API calls on behalf of the user that authorized your app. You can see how to use it in the Making API Calls with Access Tokens section below.
Save the Refresh Token
Access tokens are only valid for about an hour. You’ll want to securely store the refresh_token, which can be used later to generate a new access token without forcing the user to complete another OAuth flow. Please refer to the Refreshing an Access Token section.
Account Creation Flow
When a user without a Dropbox Sign account visits your authorization url, they’ll need to sign up from that page before they can authorize your app. It’s possible to do that, but we also offer an approach. You can create the users Dropbox Sign account and get the access token at the same time. However, the access token will not work until the user has confirmed their account and authorized your app.
Production Approval Required
Your app must be approved for production before this flow is possible.
Create account
The first step is calling /account/create and passing your API app’s client_id and client_secret.
Example
Show Response
User confirms account
The user is sent an email from Dropbox Sign with a hyperlink to confirm their account activation. Once the user accesses Dropbox Sign, they’re prompted to authorize your Dropbox Sign app.
User activation required
The user must complete this step for this flow to work. The access_token will not work until the user has activated their account and authorized your app.
Once the new user has approved your app, the access_token can be used to call the Dropbox Sign API on their behalf. The refresh_token should also be saved and used once the access token expires.
Making API Calls With Access Tokens
Now that you have an access_token, you can make API calls on behalf of other users. When making API calls, you’ll need to pass the access token by setting the HTTP header Authorization: Bearer <oauth2-access-token>.
Signature Request Visibility
By design, your app’s visibility into customer activity is limited to signature requests created using your API app. You can’t see any signature requests that the user sends directly from their own account.
Example
Signature Request with Access Token
For this example, let’s send a non-embedded signature request (/signature_request/send) and replace the basic auth with an access token.
Example
Refreshing an Access Token
Access tokens are only valid for a given period of time (typically one hour) for security reasons. Whenever acquiring a new access token, the expires_in parameter specifies the time (in seconds) before it expires.
You can use the refresh_token to generate a new access_token for a user that has previously authorized your app without prompting them to complete another OAuth flow. This creates a smoother experience for users of your app, but only works as long as they have not revoked authorization to your app and the access scopes have not been changed.
Send a POST request to /oauth/token?refresh with the following parameters:
Example
Payload
Code
Show Response
More Information
Here are a few links to read up on related topics and get a better understanding of our API.